
This guide walks you through the shoulder evaluation essentials: patient history, visual assessment, ROM and strength tests, special assessments, and clinical decision-making. Refine your shoulder evaluation skills for better diagnoses.
Shoulder injuries can sideline athletes, limit daily activities, and cause persistent pain that interferes with quality of life. As a clinician, your ability to conduct a thorough shoulder pain evaluation can mean the difference between an accurate diagnosis and a missed injury. But where do you start? With so many potential issues—rotator cuff tears, impingement, instability—having a structured approach is key.
This guide walks you through the essential steps—patient history, visual assessment, ROM testing, MMT, special tests, and clinical decision-making—to help you pinpoint the root cause of dysfunction. Refining your evaluation skills leads to better diagnoses, smarter treatment plans, and improved patient outcomes.

Understanding Shoulder Anatomy and Function
Understanding the anatomy of the shoulder is the foundation of any evaluation. With the greatest range of motion of any joint in the body, the shoulder is both highly functional and highly susceptible to injury.
Overview of the Shoulder Complex
The shoulder is a ball-and-socket joint made up of three bones:
- Humerus – The upper arm bone, which fits into the shoulder socket.
- Scapula – The shoulder blade, which provides attachment for multiple muscles.
- Clavicle – The collarbone, which connects the arm to the trunk.
These bones interact at four key joints:
- Glenohumeral Joint (GHJ) – Primary ball-and-socket joint.
- Acromioclavicular Joint (ACJ) – Where the clavicle meets the scapula.
- Sternoclavicular Joint (SCJ) – Connecting the clavicle to the sternum.
- Scapulothoracic Joint – Where the scapula glides over the ribcage.
Muscular Structures
The muscles surrounding the shoulder provide both mobility and stability. The key players include:
- Rotator Cuff Muscles – Supraspinatus, infraspinatus, teres minor, and subscapularis, which stabilize the GHJ.
- Deltoid – a large, triangular shoulder muscle responsible for arm movement and stability. It consists of three heads—anterior, lateral, and posterior—which collectively enable shoulder flexion, abduction, extension, and rotation while stabilizing the glenohumeral joint during movement.1
- Trapezius and Serratus Anterior – Essential for scapular positioning and control.
Functional Movements
It’s crucial to evaluate functional movements like overhead reaching, pushing, pulling, and rotational tasks. How smoothly do these motions occur? Do they cause pain or compensatory movements? Without connecting these measures to real-world function—how a person moves, performs daily activities, and meets their physical demands—raw numbers alone are meaningless.
Patient History: Setting the Foundation for An Accurate Diagnosis
Getting a Thorough Patient History
A great evaluation starts with a great conversation. Your patient’s history can give you critical insight into their condition before you even begin physical testing.
Questions to Ask
- When did the pain start? Was it due to an injury, or did it develop gradually?
- What movements make it worse or better? Overhead activities? Sleeping on one side?
- Have they had a past injury or surgery? Prior instability, fractures, or rotator cuff tears?
- Are there any neurological symptoms? Numbness, tingling, or weakness may suggest nerve involvement.
- What treatments have you tried in the past—physical therapy, injections, chiropractic care—and what has or hasn’t worked for you?
Red Flags
It’s crucial to recognize when symptoms go beyond musculoskeletal issues, as certain red flags may require immediate referral to a physician for further evaluation.
Be aware of symptoms that may indicate more serious conditions:
- Pain at night that doesn’t improve with rest – Possible sign of a tumor or systemic disease.
- Pain radiating down the arm – Could indicate cervical radiculopathy.
- Unexplained swelling or warmth – May suggest infection or inflammatory arthritis.
Visual Inspection and Palpation
How to Conduct a Visual Inspection
Your eyes are just as important as your hands in a shoulder evaluation. Begin by observing the patient’s overall posture and symmetry. Look for forward head positioning, rounded shoulders, or excessive scapular winging, which may indicate muscular imbalances or poor movement mechanics. Note any visible muscle atrophy, particularly in the deltoid, supraspinatus, or infraspinatus, as this can signal chronic rotator cuff pathology or nerve involvement. Swelling or discoloration around the shoulder may point to recent trauma, inflammation, or infection. Pay attention to how the patient naturally holds their arm—do they guard or avoid certain positions?
Palpation Tips
Palpate structures systematically, feeling for tenderness, swelling, or deformities. Move through these key areas:
- AC joint – A common site for arthritis, separations, or ligament sprains.
- Clavicle – Check for fractures, step-offs, or malalignment, which could indicate prior injury.
- Scapula – Poor positioning or winging may suggest muscle imbalances, nerve dysfunction, or postural deficits.
- Biceps tendon – A tender or “popping” biceps tendon could indicate tendinopathy, instability, or a possible labral tear.
- Rotator cuff insertion points – Palpate the supraspinatus, infraspinatus, and subscapularis tendons for signs of tenderness or thickening, which could suggest tendinopathy or tears.
- Subacromial space – Tenderness here may indicate bursitis or impingement syndrome.
By combining observation with methodical palpation, you can uncover underlying dysfunctions that may not be obvious through movement assessments alone.
Range of Motion (ROM) Assessment
Assessing both active and passive range of motion (ROM) is essential in determining whether movement limitations stem from muscular dysfunction, joint restrictions, or structural damage. Active ROM assesses the patient’s ability to move their shoulder independently, highlighting potential muscle weakness, pain, or neuromuscular control issues. Passive ROM, on the other hand, involves the clinician moving the patient’s arm without their assistance, helping to identify stiffness, capsular restrictions, or joint pathology. Comparing the two can provide critical insight—if passive motion is significantly greater than active motion, muscular weakness or neuromuscular inhibition may be the culprit.
Normal Shoulder Ranges2
- Flexion – 180°
- Extension – 60°
- Abduction – 180°
- Internal Rotation – 70°
- External Rotation – 90°
Beyond simply measuring ROM, it’s important to assess movement quality. Are there compensations, such as excessive scapular elevation or trunk leaning? Does the patient experience pain at a specific point in the range? A painful arc between 60° and 120° of abduction, for example, may indicate subacromial impingement. Identifying these restrictions and pain patterns helps refine your diagnosis and directs the next steps in treatment planning.
Strength Testing: MMT and Dynamometry
Manual Muscle Testing (MMT)
Manual Muscle Testing (MMT) is a widely used method to observe shoulder muscle strength on a 0–5 scale, with 0 indicating no contraction and 5 representing full strength against resistance.
When performing MMT, focus on key shoulder stabilizers:
- Supraspinatus – Test by resisting abduction in the scapular plane. Weakness here may indicate a rotator cuff tear.
- Infraspinatus and Teres Minor – Assess external rotation strength by resisting movement against external rotation at 90° elbow flexion. Weakness may suggest rotator cuff pathology.
- Subscapularis – Evaluate internal rotation by applying resistance as the patient presses their hand into their abdomen (Belly Press Test) or resists internal rotation with the arm at the side.
Using Dynamometry
Dynamometry provides precise, quantifiable strength measurements beyond the subjective nature of MMT. Unlike manual testing, which relies on clinician-applied resistance, dynamometers measure force output in an objective, reproducible way. These tools assess different contraction types, including:
- Isometric strength – Peak force during a static hold.
- Concentric strength – Force during muscle shortening.
- Eccentric strength – Controlled resistance as the muscle lengthens.
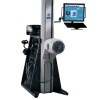
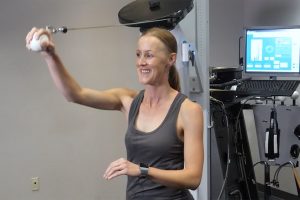
Advanced systems like the PrimusRS use dynamometry to provide detailed strength profiles, allowing clinicians to analyze imbalances, track progress, and tailor rehabilitation programs with precision. These insights are crucial for ensuring recovery and preventing re-injury.
Special Tests for Shoulder Injuries
Special tests help clinicians pinpoint specific shoulder pathologies by reproducing symptoms or assessing mechanical dysfunction. Below are essential tests for evaluating shoulder conditions, along with instructions and interpretation tips.
Isometric Test
Purpose: Evaluates muscle activation and endurance to identify weakness or imbalances contributing to shoulder pain.
How to Perform:
- Patient holds their arm in a specific position (e.g., 90° abduction or neutral position) without moving.
- Examiner applies a steady resistance while the patient maintains the position.
- Hold for several seconds to assess endurance and strength consistency.
Interpretation: Inability to hold the position, pain, or noticeable shaking may indicate muscle weakness, fatigue, or underlying pathology.
Power Test
Purpose: Assesses the strength of the shoulder muscles, particularly for athletic or high-performance demands.
How to Perform:
- Patient performs a rapid resisted movement, such as an overhead press or external rotation against resistance.
- Examiner applies resistance to gauge force output and control.
- Compare both sides for deficits.
Interpretation: Reduced power, asymmetry, or pain during testing may indicate rotator cuff dysfunction, nerve involvement, or strength deficits affecting shoulder function.
Endurance Test
Purpose: Assesses muscular endurance of the rotator cuff and scapular stabilizers, which are crucial for sustained shoulder function.
How to Perform:
- Have the patient hold their arm in 90° of abduction and external rotation.
- Instruct them to maintain this position for 30–60 seconds.
- Observe for fatigue, scapular dyskinesis, or compensatory movements.
Interpretation: A patient unable to maintain the position suggests rotator cuff weakness or scapular instability. Early fatigue or pain may indicate underlying tendinopathy or neuromuscular deficits.
Learn how to perform these shoulder evaluation tests on the PrimusRS.
Neer’s Test
Purpose: Identifies subacromial impingement by compressing the rotator cuff against the acromion.
How to Perform:
- Patient sits or stands with arms relaxed.
- Examiner stabilizes the scapula with one hand while passively raising the patient’s arm into full flexion.
- Overpressure is applied at end range.
Interpretation: Pain at the end range suggests subacromial impingement, often involving the supraspinatus or long head of the biceps.3
Hawkins-Kennedy Test
Purpose: Detects subacromial impingement by compressing the supraspinatus tendon.
How to Perform:
- Patient seated with shoulder flexed to 90° and elbow bent to 90°.
- Examiner supports the elbow and forcefully internally rotates the arm.
Interpretation: Pain near the anterior shoulder suggests subacromial impingement or rotator cuff involvement.
Apprehension Test
Purpose: Assesses anterior shoulder instability or potential labral involvement.
How to Perform:
- Patient lies supine with shoulder in 90° abduction and 90° elbow flexion.
- Examiner slowly externally rotates the shoulder while monitoring for signs of apprehension.
Interpretation: Apprehension or fear of dislocation indicates anterior instability, often due to previous dislocations or labral injuries.
Speed’s Test
Purpose: Evaluates for biceps tendinopathy or labral pathology.
How to Perform:
- Patient extends elbow and supinates the forearm.
- Examiner resists active shoulder flexion at 60° while palpating the bicipital groove.
Interpretation: Pain in the bicipital groove suggests biceps tendinopathy.
Neurological Examination
A thorough neurological examination helps determine whether nerve involvement is contributing to shoulder dysfunction.
Start by assessing sensory function, testing light touch and pinprick sensation along dermatomal distributions to identify potential cervical radiculopathy. Reflex testing, including the biceps (C5), brachioradialis (C6), and triceps (C7) reflexes, provides insight into nerve root integrity. Evaluate motor function by testing key myotomes, such as shoulder abduction (C5) and elbow flexion (C6).
Numbness, tingling, weakness, or diminished reflexes may indicate brachial plexus injury or cervical nerve root compression. If severe weakness, progressive symptoms, or loss of bowel/bladder control is present, immediate referral for further neurological testing is warranted.
Common Shoulder Pathologies and Their Diagnostic Clues
Identifying shoulder injuries requires recognizing distinct symptom patterns and examination findings. Below are some of the most common conditions and their hallmark signs.
Rotator Cuff Tears
Rotator cuff tears cause pain, weakness, and difficulty lifting the arm, particularly in external rotation and abduction. A positive external rotation lag sign indicates supraspinatus or infraspinatus involvement, while chronic tears may lead to muscle atrophy.4
Learn more about shoulder rotator cuff injury tests.
Shoulder Impingement Syndrome
Pain with overhead movements, reaching behind the back, or sleeping on the affected side is a key sign. Tests like Neer’s and Hawkins-Kennedy help differentiate Shoulder Impingement vs Rotator Cuff Tear.
Adhesive Capsulitis (Frozen Shoulder)
Marked by progressive stiffness and pain, this condition restricts both active and passive ROM, especially external rotation. It often affects those with diabetes or thyroid disorders.5
Labral Tears
Clicking, locking, or instability, with pain during overhead or throwing motions. The O’Brien’s and Biceps Load tests help confirm diagnosis.
Documentation and Clinical Decision Making
Strong documentation isn’t just paperwork—it’s the blueprint for effective treatment. Clearly record ROM, strength, special test results, and pain patterns to track progress and fine-tune interventions. Use clinical reasoning to connect the dots—does limited motion suggest frozen shoulder, or is it guarding from rotator cuff pain? If you suspect fracture, severe joint instability, or symptoms beyond musculoskeletal causes, refer out for X-rays, MRIs, or specialist evaluation. When in doubt, extra imaging can rule out serious issues and ensure patients get the right care at the right time.
Master Shoulder Evaluations for Accurate Diagnoses and Better Outcomes
A thorough shoulder pain evaluation is the key to getting the right diagnosis and the best results. By assessing posture, strength, range of motion, and using special tests, clinicians can uncover the real cause of pain. With the right approach, you can fix shoulder pain without surgery and get patients back to moving pain-free.
Want to take assessments to the next level? Physical therapy equipment for shoulder rehab, like the PrimusRS, makes it easier to measure strength and movement with real data. With better tools, you get better answers—and better outcomes for your patients.